Multiple Lights
Reading time: 4 mins.Linear Light Response
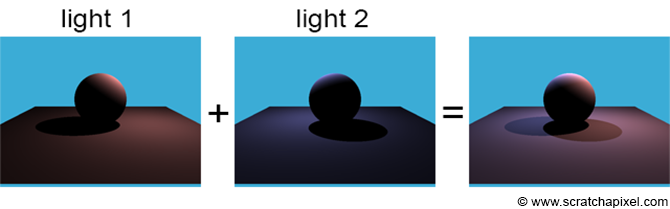
Imagine that you want to photograph an object such as the toy in Figure 1 with different lights. Let's say that all lights are turned off to start with. You then switch on the first light, take a picture, switch the light off and repeat this process for each light. In the end, turn all the lights on and take another picture. If you now add up all the pictures that you took with each light turned on individually and compare it to the picture where all the lights were turned on at once, then the two resulting images should look the same.
$$ \text{Image}_{\text{light1}} + \text{Image}_{\text{light2}} + \text{Image}_{\text{light3}} + ... = \text{Image}_{\text{all lights}}. $$
In other words, the contribution of each light adds up linearly. This is an important observation for two reasons. First, if you wish to create photorealistic images then your renderer needs to follow the same principle. It is also important for artists to recompose CG renders from individual layers where each layer represents the contribution of one particular light from the scene. Adding a curve to change the brightness of the image in a non-linear way (such as adding a gamma for instance) before adding it up to the other layers would lead to an incorrect result from a physical point of view. More importantly from a programming point of view, this principle simply means that in the renderer, the contribution of each light just needs to be summed up. In other words, the total amount of light arriving at a point is just the linear sum of the amount of light that each light is contributing to.
In mathematical terms, for a diffuse surface, this concept can be written using the following formula:
$$S_P = \sum_{N=0}^{N=(nlights-1)}\dfrac{\rho_d}{\pi} * Li_N * \cos (N.L_N).$$Where \(S_P\) stands for the shading point. The symbol \(\sum\) in mathematics means "sum". In other words, for each light in the scene (there is \(nights\) in total), we compute the diffuse equation by replacing in the equation the term \(Li_N\) and \(L_N\) with the current light intensity and direction. This is the same as:
$$S_P = \dfrac{\rho_d}{\pi} * (Li_0 * \cos (N.L_0) + Li_1 * \cos (N.L_1) + ... + Li_{N-1} * \cos (N.L_{N-1})) .$$From a programming point of view, handling more than one light source is very simple. First, you can store all the lights in a list and pass this list to the castRay() function which is where shading is done. We then iterate over all the lights and add their contribution to the shaded point illumination. Keep in mind that the light contribution is attenuated by the cosine of the angle between \(P\)'s normal and the light direction. This term is different for each light and thus needs to be computed for each light. Similarly, a shadow ray needs to be cast for each light as well. In the end, the code looks as follows:
int main(int argc, char **argv)
{
    ...

    // loading geometry
    std::vector<std::unique_ptr<Light>> lights;

    Matrix44f l2w1;
    l2w1[3][0] = 2;
    l2w1[3][1] = 4;

    lights.push_back(std::unique_ptr<Light>(new PointLight(l2w1, Vec3f(1, 0.6, 0.6), 500)));

    Matrix44f l2w2;
    l2w2[3][0] = -1;
    l2w2[3][1] = 4;
    l2w2[3][2] = -1;

    lights.push_back(std::unique_ptr<Light>(new PointLight(l2w2, Vec3f(0.6, 0.6, 1), 500)));

    // finally, render
    render(options, objects, lights);

    ...
}

Vec3f castRay(
    const Vec3f &orig, const Vec3f &dir,
    const std::vector<std::unique_ptr<Object>> &objects,
    const std::vector<std::unique_ptr<Light>> &lights,
    const Options &options)
{
    Vec3f hitColor = 0;
    IsectInfo isect;
    if (trace(orig, dir, objects, isect)) {
        Vec3f hitPoint = orig + dir * isect.tNear;
        Vec3f hitNormal;
        Vec2f hitTexCoordinates;
        isect.hitObject->getSurfaceProperties(hitPoint, dir, isect.index, isect.uv, hitNormal, hitTexCoordinates);
        for (uint32_t i = 0; i < lights.size(); ++i) {
            Vec3f lightDir, lightIntensity;
            IsectInfo isectShad;
            lights[i]->getShadingInfo(hitPoint, lightDir, lightIntensity, isectShad.tNear);
            bool vis = !trace(hitPoint + hitNormal * options.bias, -lightDir, objects, isectShad, kShadowRay);
            // accumulate light contribution
            hitColor += vis * isect.hitObject->albedo * lightIntensity * std::max(0.f, hitNormal.dotProduct(-lightDir));
        }
    }
    else {
        hitColor = options.backgroundColor;
    }

    return hitColor;
}
Here is a result of rendering the scene with two spherical lights:
Note that you can get the same effect by rendering the contribution of each light individually and adding these images up in a paint program such as Photoshop (switch the blend mode to Linear Dodge). Check the render with the two lights on with your composite image in Photoshop. They should look the same.